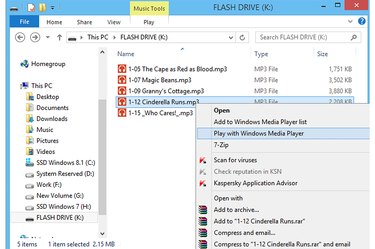
Transfer your music to a USB flash drive and take your favorite songs with you anywhere you go. You can transfer dozens of songs -- hundreds even, if you have a large flash drive -- to the drive in a matter of minutes and use Windows Media Player 12 on any PC to play back the files. However, playlists made using media on a flash drive won't play properly if that drive is not connected to the computer.
Using File Explorer
Video of the Day
Step 1
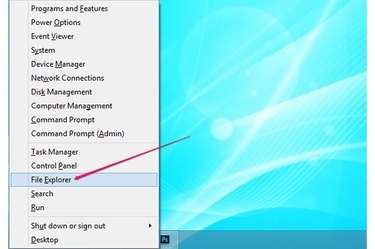
Press Windows-X to expand the Power User menu in Windows 8.1 and select File Explorer to open the utility. In Windows 7, expand the Start menu and click Computer to launch Windows Explorer.
Video of the Day
Step 2
Plug the USB flash drive into a free USB port on your computer. Whenever possible, avoid using USB hubs and plug the drive into a port on the PC itself.
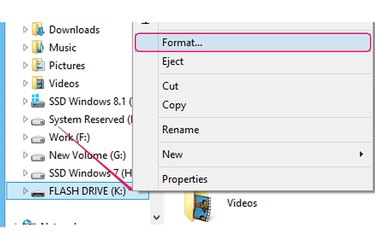
Format the flash drive if you want to erase everything on it or change the file system. Formatting the drive is not mandatory. Right-click the drive in the left pane and select Format from the context menu.
Step 3
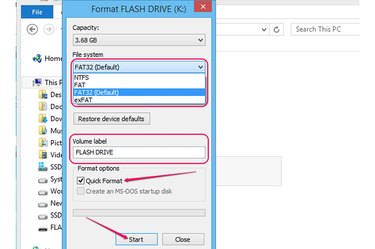
Select a file system from the File System drop-down box. FAT32 is compatible with most operating systems and media players and is recommended for storing relatively small files -- such as audio files -- on drives that are smaller than 32GB.
Change the name of the flash drive, if necessary, from the Volume Label field. Check the Quick Format box if you don't want to check the drive for bad sectors during the format process. Disabling the Quick Format option significantly increases the duration of the format process. Click Start to format the drive.
Step 4
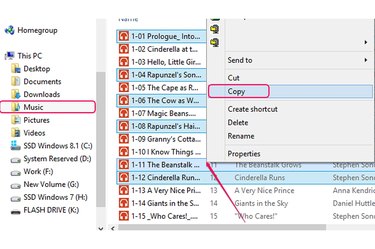
Open the folder that contains the audio files and select the items you want to transfer to the flash drive. To select everything in the folder, press Ctrl-A. Select several items by holding Ctrl and clicking each file. Right-click one of the selected files and click "Copy" to copy all of them to the clipboard.
Step 5
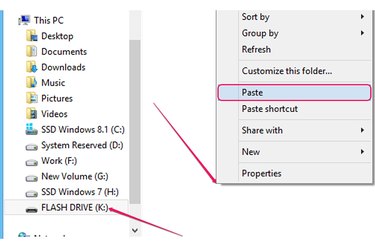
Select the USB flash drive, right-click on an empty spot inside the right pane and select Paste from the context menu to transfer the audio files from the clipboard to the drive.
Using Windows Media Player
Step 1
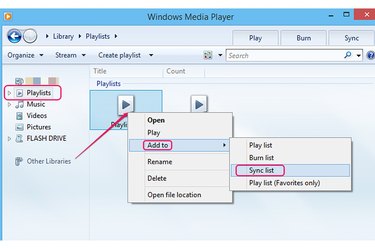
Launch Windows Media Player, select Playlists from the left pane to view your playlists, right-click the playlist you want to transfer to the flash drive, select Add to and click Sync list. The audio tracks are added to the Sync list.
Step 2
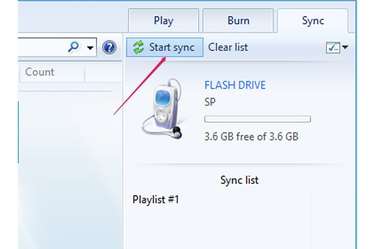
Click the Start sync button on the Sync tab to transfer the playlist to the USB flash drive. All audio tracks are copied to the drive -- a new folder labeled Music is created automatically.
Step 3
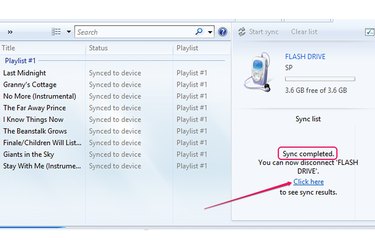
Click the Click here link after the transfer is complete to view the audio tracks on the flash drive. The Sync completed message indicates a successful transfer.
Before disconnecting the USB flash drive from the computer, right-click the USB icon in the system tray and select Eject Flash Drive from the context menu. Then remove the drive from the computer.